


Welcome Back
Sign in to be closer to your community!
Follow other divas, like and comment
on their posts, message them, and see
who loved your posts!
 Login with Google
 Login with Twitter
OR
Join FashionPotluck.com
Create your own profile in order to create content, follow other divas and like their posts, use our own messenger, and be a part of a growing international women community!
Signup as a Community Member

WELCOME TO OUR COMMUNITY
Fashion Potluck -
the first social media
platform for women.
You are free to read/watch & create content,
express your true self, and interact with others.


LIFESTYLE
Top Photography Tips for Bloggers/Creators!

 by
by 
I have been a photographer for much longer than I have been blogging, and it’s interesting to see the photos that people take for their blogs. They truly do vary depending on the niche of the blogger! But overall, there are a few different photography techniques and tricks that all bloggers can use, regardless of what they blog about, that will instantly boost the quality of their content!
Lighting, it truly is everything!
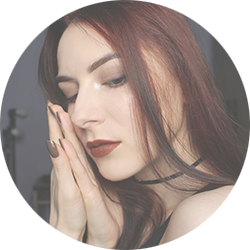
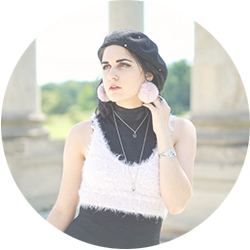
While I have not been overly conscious of lighting for photography for the past four years, it is actually from the past two years of being on my university course that has made me understand how vital it is to think about lighting when taking a photograph (and shooting video content). When you think about appropriate lighting, you need to think; what mood am I trying to portray? What do I want to achieve from this photo? Who is my intended audience? With bloggers, a nice bright and warm tone encourages the viewer to feel comfortable with the image and helps the viewer to trust the blogger. But you might be a photography blogger (like myself) or a mental health blogger (also something I have touched upon) and with that you might want to create content that isn’t bright and warm. Instead you may want to make content with a darker underlying tone. With that, you would want blue tones and dark shadows. Think about what image it is you want to make, and what lighting would help make an impact on the overall image. And that doesn’t mean that having dark shadows is just for dark/gloomy images. Below I have two images with the same kind of light source, but used differently to emphasize different emotions.
Framing, aka the rule of thirds!
I love encouraging the rule of thirds to EVERYONE! While it is not essential to follow this rule for every photo, it is always good practice to be able to think of it as you’re taking a picture so that you can frame up the image that makes it comfortable to the eye. If you are at least aware of the basic rule of thirds then you have the freedom to be able to break those rules WHILE knowing exactly what you’re doing. You may have seen the grid lines on either your phones camera or in Instagram when you’re editing a photo. The square (depending on the ratio of your photo) will be split in 9 equal sections, and it is on the cross points of the grid you want to put the main focus. These are the places on the grid that feels more natural to the eye and grabs the focus more than anywhere else. Say you are a beauty blogger and you want to showcase some eyeshadow in a post; when you’ve got the camera close up, you can place your eyes on either the top or bottom two cross-over points. I personally go for somewhere in the middle, where the top two cross-over points touch the eyebrows and the bottom points touch the bottom of the eyes. Once cropped, the face is evenly balanced across the frame because I chose to go with the rule of thirds to set up the framing. Nothing is taking up too much of one square compared to the others. You can implement the rule of thirds to ANY type of content! Give it a try!
Complimentary colours!
Complimentary colours more simply for an aesthetic, it’s not something that NEEDS to be followed but if you want to create content that catches the attention of particular items or subjects then it is worth thinking about having complimentary colours. For a better idea on complimentary colours, pull up a picture of the colour wheel and what you will notice is you’ll see each colour has its opposing colour; for example opposite red is green. That there is your complimentary colour! Whatever colour you are wanting to use, look for its opposing colour on the wheel. The purpose of this is that you can use this to your advantage to draw attention to something. Say you have bright red lipstick that you want to promote, to really have it stand out you can place it in front of a green material/green backdrop. Not only will it emphasize the product but it does so COMFORTABLY! It’s like saying stripes and spots clash, there are some colours that just clash when you put them together, whereas complimentary colour pairs work together!
Let me know what technique you like most!
Until next time,
R xoxo
Words Minimum :
Add Comments